Last month, I participated in my very first art market—and what a lovely introduction it was. The event took place at the North Carolina Arboretum during their Nature Play Day, a celebration designed to highlight the benefits of outdoor play for kids and families. Think fairy houses, gnome homes, stick forts, storytelling, pond life exploration, and more—all wrapped in a gentle, community-focused atmosphere.
With just six maker booths, the setting was intimate and inviting. It turned out to be the perfect place for someone like me—an artist, yes, but also an introvert—to try selling in-person for the first time.
What Made This Market a Great First Experience
From the start, this market made things easy for participants. The Arboretum provided each artist with a tent, table, and chairs—three logistical pieces you’d typically have to figure out on your own. And in case of bad weather, they had a backup plan: all vendors could be moved indoors to the Arboretum’s educational center.
They even supplied carts to help us haul our items from the parking area to our booths. This small but mighty detail made setup so much smoother—and it’s something to ask about when you're applying to future markets.
Oh, and admission was free for vendors. That’s a $20-per-vehicle bonus I was happy to accept.
Here’s how my booth turned out:
I brought cards, bookmarks, stickers, small and medium prints, and a few framed originals. I kept my display simple and approachable, with clear signage for pricing and payment options (including Venmo). My goal was to make it easy for anyone—whether they were a casual browser or an enthusiastic collector—to buy something and connect with my work.
Talking to Strangers… as an Introvert
Was I nervous? Absolutely. But I reminded myself that I wasn’t there to “sell”—I was there to talk about the thing I love: nature-inspired art. Once I started conversations around that, my nerves softened. People were kind, curious, and genuinely interested in the process behind the pieces.
Sales went better than I expected, and I left feeling not only encouraged—but excited to try another market this year.
My Beginner Tips for Selling at an Art Market
1. Choose Your Market Wisely
Not all markets are created equal. Look for beginner-friendly ones like:
- Smaller, community-based events
- Markets that provide tents/tables
- Events that align with your art’s theme (nature, craft, family, etc.)
A supportive environment makes all the difference.
2. Keep Your Display Simple but Clear
People should know at a glance:
- What you're selling
- How much it costs
- How they can pay
Use table signs with big, legible fonts. Include mobile payment options if possible. The majority of my sales were via Venmo.
3. Have a Range of Price Points
I offered items from $5 bookmarks to $250 framed prints. This lets folks support your work at whatever level they’re comfortable with. Cards, stickers, and bookmarks especially were popular as impulse buys.
4. Practice Your Setup at Home
Before the big day, do a full mock setup in your driveway or living room. You'll:
- Notice if anything’s missing (tablecloths, signs, card readers)
- Get a sense of how long setup will take
- Avoid day-of panic
5. Bring the Essentials
Aside from your art, here are a few extras I recommend:
- A cash box with small bills and change
- A portable phone charger
- Clips or weights in case it’s windy
- Snacks and water (markets can be long!)
- A notebook to jot down what sold, what people said, or ideas for next time
6. Take Breaks and Breathe
If you're shy like me, know that you can step back when needed. Invite a friend to trade-off with, or just take a quiet moment behind your booth. People will understand.
And remember: talking about your art is just sharing joy. That’s it.
7. Learn from Each Experience
After the event, I made a list of:
- What sold well
- What I wish I had brought more of
- What didn’t work
I also noted which interactions felt meaningful—because connection is the true currency of any art market.
The Bottom Line
Art markets aren’t just about sales. They’re about sharing your passion, finding your audience, and becoming part of a creative ecosystem. They can be intimidating at first (especially if you're a bit quiet like me), but they’re also incredibly rewarding.
Here’s a shot of our cozy little market on that sunny day:
If you’ve been thinking about signing up for your first art market—this is your sign. Go for it. Be prepared, stay open, and let your art do the talking.

Last month, I participated in my very first art market—and what a lovely introduction it was. The event took place at the North Carolina Arboretum during their Nature Play Day, a celebration designed to highlight the benefits of outdoor play for kids and families. Think fairy houses, gnome homes, stick forts, storytelling, pond life exploration, […]

For many artists, the idea of an artist residency carries a powerful mix of excitement and pressure. It’s a chance to step away from daily distractions, dive deep into your work, and find fresh inspiration. But often, the pressure to "get it right" when applying can feel overwhelming — like you have to somehow predict and plan your greatest masterpiece in advance.
If you’ve ever stared at a residency application wondering if you're "enough" — enough of a visionary, enough of a planner, enough of a polished communicator — you’re not alone. The truth is, the key to a meaningful residency experience starts long before you ever step foot into a studio or residency space. It starts with openness.
Let Go of the Pressure
First things first: you don’t have to have it all figured out.
One of the biggest myths about artist residencies is that you need a grand, fully-formed project to get accepted. In reality, what most programs are looking for is a sincere, committed exploration — not a final product. They want to see your curiosity, your willingness to engage with a place, a community, or a question.
Instead of asking yourself, “Is my project impressive enough?” try asking, “Am I genuinely excited about what I want to explore?” That excitement, that authenticity, is magnetic. And it shines through in applications more than rigid plans ever do.
Pick a Topic, Focus on It
When preparing your residency application, think about the themes or questions that are currently calling to you.
Pick a topic. Focus on it.
But don’t chain yourself to it.
You’re not writing your artistic destiny in stone — you’re picking a starting point. A clear topic gives your application structure and shows reviewers that you’ve thought intentionally about your time. Yet it also leaves you room to evolve once you’re actually immersed in the residency experience.
Maybe you want to explore the relationship between memory and landscape. Or the language of color in urban environments. Or how soundscapes shape emotional memory. Whatever your focus, trust that the topic will lead you into unexpected places — and that’s a good thing.
Residencies often have a way of gently rerouting our plans for the better. The light, the people, the rhythm of a new place — they can shift your vision in ways you couldn’t have anticipated.
Find a Way to Express It
Once you’ve picked your topic, the next step is finding a way to express it.
For visual artists, expression could be be a small sample series, sketches, or a mood board. Depending on your topic and/or the length of the residency, you might even complete your project, but don't make this the goal otherwise the pressure could become overwhelming.
Whatever medium you work in, the goal is to make your idea tangible — not perfect, but real. You’re offering a glimpse into your creative mind, inviting the selection committee to imagine the journey with you.
And remember: you are not being judged against perfection. You are being considered for your ability to imagine, to wonder, and to pursue a thread of meaning with heart and dedication.
Stay Open During the Residency, Too
If you’re accepted — and even if you’re not right away — it’s crucial to carry this spirit of openness with you.
Residencies are fertile, living ecosystems. Sometimes your project will blossom exactly as you envisioned. Sometimes it will morph completely, responding to conversations, collaborations, or even quiet moments of solitude.
Both outcomes are equally valuable.
Success isn’t measured by how closely you stick to your original plan. It’s measured by your willingness to listen — to yourself, to the environment, to the unexpected callings that arise.
It’s Okay If It’s Messy
Art — real art — is messy. Growth is messy. Transformation is messy.
It’s okay if you don’t have a tidy answer when someone asks what you’re working on. It’s okay if your project spills into directions you didn’t predict. It’s okay if some days you just sit and think, or walk for miles, or spend an afternoon making one rough sketch that leads nowhere obvious.
These moments are not wasted. They are the soil from which deep creative work eventually grows.
A Final Thought: Trust Yourself
If you take one thing from this, let it be this: You are enough.
Your questions are enough.
Your imperfect sketches are enough.
Your evolving, curious, searching self is enough.
Residencies are not just about producing work — they are about giving yourself the space to dream, to question, and to expand. Your willingness to stay open, to be present with your topic, and to trust the process is the most important thing you bring to any creative opportunity.
When you pick a topic, focus on it, and find a way to express it — all while giving yourself permission to be human and imperfect — you’re already well on your way.
The rest will unfold, just as it’s meant to.
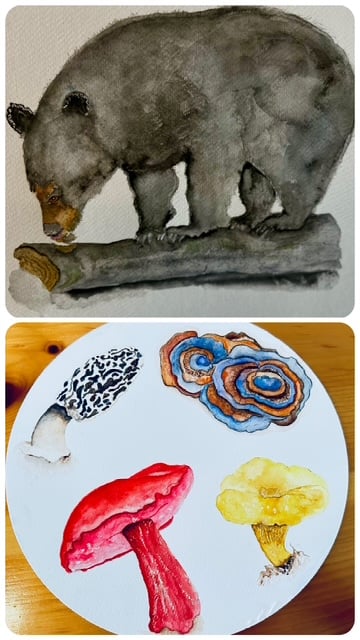
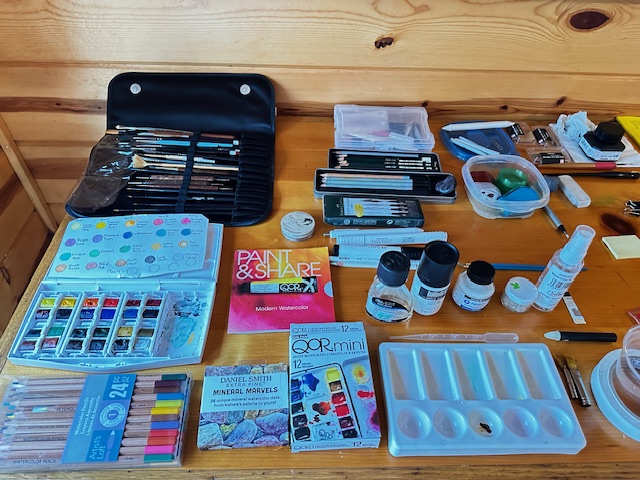
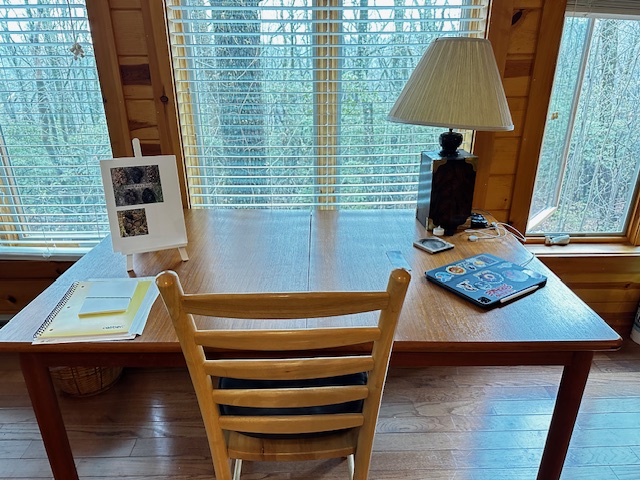
P.S. I had my first artist residency last month at Wildacres Retreat. Initially, I hesitated about applying because I didn't have a fully formed project. As a nature artist, I knew that I wanted to focus on black bears and their role as seed dispersal agents in forests, however, I had no idea how that might be expressed visually. I stuck with the topic though. Once I arrived at the residency, an idea about how to express it visually formed and continued to evolve while there through my focus on research, conversations with others I met, and being in the environment itself. At the end of my one-week residency, I expressed it with a digital story "Seeds on the Move: a seed's journey through black bear scat" combining watercolor, digital illustration, and animation. Is it finished, NO, but the residency afforded me time I wouldn't otherwise had to develop my topic into a pleasing rough draft that can complete later. The residency itself was amazing! I spent time in a gorgeous area, met new friends, and was taken care of by the staff. These are some pics from my time at Wildacres. Check out their website for more information about their residencies.


For many artists, the idea of an artist residency carries a powerful mix of excitement and pressure. It’s a chance to step away from daily distractions, dive deep into your work, and find fresh inspiration. But often, the pressure to “get it right” when applying can feel overwhelming — like you have to somehow predict […]
Comic books are more than just stories; they're vibrant pieces of art, nostalgic treasures, and prized collectibles. Whether you're showcasing a rare issue, a signed edition, or a beloved favorite, framing your comic book allows you to display it proudly while preserving its condition.
In this guide, we'll walk you through the steps to frame a comic book, ensuring it remains protected and becomes a standout piece in your collection.
Why Frame a Comic Book?
Framing a comic book isn't just about aesthetics; it's about preservation and appreciation. A well-framed comic can:
- Protect against dust, moisture, and UV light, which can degrade paper over time.
- Display the artwork and cover design, turning it into a conversation piece.
- Preserve the comic's condition, maintaining its value for years to come.
Materials You'll Need
Before you begin, gather the following materials:
- Comic Book: Choose the issue you want to frame.
- Archival Bag and Board: Protects the comic from environmental factors.
- Frame: Preferably a shadow box or a frame deep enough to accommodate the comic's thickness.
- UV-Protective Glass or Acrylic: Prevents fading from sunlight exposure.
- Acid-Free Backing Board: Provides support without damaging the comic.
- Mounting Corners or Strips: Secures the comic without adhesive contact.
- Mat Board (Optional): Adds a decorative border and prevents the comic from touching the glass.
Frame Destination has you covered for all materials in this guide: Shop comic book frames and framing materials.
Step-by-Step Framing Guide
1. Prepare Your Comic Book
- Bag and Board: Place your comic in an archival-quality bag with a backing board to protect it from dust and fingerprints.
- Positioning: Decide if you want to display the comic with the bag or remove it for a cleaner look. If removing, handle the comic with clean hands or gloves.
2. Choose the Right Frame
- Size: Ensure the frame is slightly larger than the comic to prevent compression.
- Depth: A shadow box frame provides enough space for the comic without pressing it against the glass.
- Material: Opt for frames made of wood or metal for durability.
3. Mount the Comic
- Mat Board: If using, cut an opening slightly smaller than the comic to hold it in place.
- Mounting Corners/Strips: Attach these to the backing board to secure the comic without adhesive touching it.
- Placement: Center the comic on the backing board or mat.
4. Assemble the Frame
- Insert: Place the mounted comic into the frame.
- Seal: Secure the backing board and ensure all components are snug but not tight.
- Clean: Wipe the glass or acrylic to remove any fingerprints or dust.
5. Display Your Framed Comic
- Location: Hang the frame in a spot away from direct sunlight and humidity to preserve the comic's condition.
- Hardware: Use appropriate wall anchors or hooks to support the frame's weight.
Additional Tips
- Floating Display: For a modern look, consider "floating" the comic by mounting it on a mat without a window, allowing the edges to be visible.
- Multiple Comics: Create a collage of related issues or a series for a dynamic display.
- Professional Help: If framing a particularly valuable comic, consult a professional framer experienced with collectibles.
By following these steps, you can transform your cherished comic book into a piece of art that not only enhances your space but also preserves a slice of pop culture history.
Frequently Asked Questions About Framing Comic Books
Can I frame a comic book without damaging it?
Yes. Always use acid-free materials and mounting corners or archival sleeves that do not use adhesive. Avoid taping or gluing the comic directly to the backing.
Should I remove the comic from its plastic sleeve before framing?
It depends. Leaving it in an archival-quality sleeve adds protection and is common for preservation. Removing it can offer a cleaner aesthetic but requires extra care to avoid damage.
What's the best frame type for comic books?
Shadow box frames are ideal since they provide enough depth for bagged and boarded comics. Look for UV-protective glass or acrylic to prevent fading over time.
Can I use regular glass instead of UV-protective acrylic?
You can, but it's not recommended. Standard glass doesn't block UV rays, which can cause fading. UV-protective acrylic is lightweight, shatter-resistant, and offers superior protection.
Written by Mark Rogers
 Mark Rogers is the President and Co-Founder of Frame Destination. With over 20 years of experience in the field, Mark has become a leading authority on framing techniques and best practices, and has earned a reputation for his innovative approaches to custom framing and frame services for photographers and artists.
Comic books are more than just stories; they’re vibrant pieces of art, nostalgic treasures, and prized collectibles. Whether you’re showcasing a rare issue, a signed edition, or a beloved favorite, framing your comic book allows you to display it proudly while preserving its condition. In this guide, we’ll walk you through the steps to frame […]
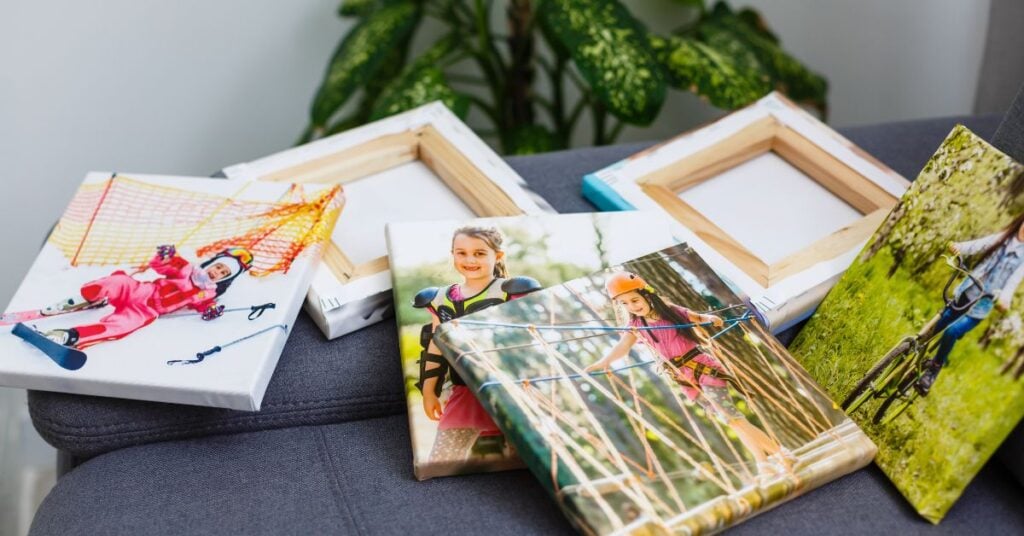
If you're looking to print or display artwork on canvas, you’ll likely come across two main options: rolled canvas and stretched canvas. Both have their own advantages, and the best choice depends on your specific needs, budget, and display preferences. Whether you're an artist, photographer, or someone looking to decorate your home, understanding the key differences between these two formats will help you make the right decision.
What Is Rolled Canvas?
Rolled canvas is simply canvas material that hasn’t been stretched over a wooden frame. It is typically sold in a roll and can be stored, shipped, or framed as needed. This option is popular among artists and photographers who want more control over how their prints are displayed, as well as those looking for a cost-effective alternative to stretched canvas.
What Is Stretched Canvas?
Stretched canvas refers to a canvas that has been pulled tightly over a wooden frame, called a stretcher bar, and secured in place. It comes ready to hang and is often used in galleries, exhibitions, and home décor. Many stretched canvases feature gallery-wrapped edges, meaning the artwork extends around the sides, eliminating the need for an additional frame.
Which Canvas Type Is Best for Your Print?
The main difference between rolled and stretched canvas comes down to presentation and flexibility. Rolled canvas gives you more control over framing and is often more cost-effective. Stretched canvas, on the other hand, comes ready to hang and offers a polished, professional appearance.
Think of it like this...
Rolled canvas is like buying a poster in a tube: you’ll need to frame or mount it yourself. Stretched canvas is like buying a framed painting: ready to hang as soon as you get it. We have guide on how to frame a canvas here.
Let’s break down the advantages of each.
Advantages of Rolled Canvas
Rolled canvas is simply canvas material that hasn’t been mounted onto a wooden frame. This option offers several benefits:
- Cost-effective – Rolled canvas is usually more affordable than stretched canvas since you're not paying for the wood frame or assembly.
- Easier to store and ship – Because it can be rolled into a tube, it’s easier to transport, store, and ship without risking damage.
- Customizable framing options – If you want to choose your own frame or stretching method, rolled canvas gives you more flexibility to customize the final presentation.
- Great for large prints – If you’re printing oversized artwork, rolled canvas makes it easier to manage without worrying about warping or frame damage during transport.
However, rolled canvas does require additional work. You’ll need to stretch or frame it before displaying it, which adds extra cost and effort.
Advantages of Stretched Canvas
Stretched canvas is already mounted onto a wooden frame (also known as a stretcher bar) and is ready to hang. Here’s why this option might be the right choice for you:
- Ready to display – Stretched canvas arrives fully assembled and can be hung immediately, making it a hassle-free option.
- Professional appearance – With clean edges and a polished look, stretched canvas is ideal for galleries, exhibitions, and home décor.
- No extra framing required – Many stretched canvases have gallery-wrapped edges, meaning the artwork extends around the sides, eliminating the need for an external frame.
- More durable over time – Since it’s already stretched correctly, the canvas remains taut and maintains its shape without the risk of creases or folds.
The main downside to stretched canvas is its size and fragility when shipping. Because it can’t be rolled up, it takes up more space and is more expensive to transport. It’s also generally pricier than rolled canvas due to the additional materials and labor involved in stretching it.
Final Advice
Choosing between rolled and stretched canvas depends on your needs. If you're looking for affordability, easy storage, and more framing options, rolled canvas is a great choice, especially if you don’t mind the extra step of mounting it yourself. But if you want something ready to hang with a professional, gallery-quality finish, stretched canvas is the way to go.
Consider your budget, storage space, and how you plan to display the artwork before making a decision. No matter which option you choose, both rolled and stretched canvas offer a stunning way to showcase your prints and artwork.
Written by Mark Rogers
Mark Rogers is the President and Co-Founder of Frame Destination. With over 20 years of experience in the field, Mark has become a leading authority on framing techniques and best practices, and has earned a reputation for his innovative approaches to custom framing and frame services for photographers and artists.
If you’re looking to print or display artwork on canvas, you’ll likely come across two main options: rolled canvas and stretched canvas. Both have their own advantages, and the best choice depends on your specific needs, budget, and display preferences. Whether you’re an artist, photographer, or someone looking to decorate your home, understanding the key […]

Vinyl records are more than just music—they’re a piece of history, nostalgia, and art. Whether you’re framing a classic album, a signed record, or a personal favorite, displaying it on your wall can turn it into a stunning focal point.
In this guide, we’ll take you step by step through the process of framing a vinyl record so you can proudly showcase your collection while protecting it from dust and damage.
Why Frame a Vinyl Record?
Framing a vinyl record isn’t just about decoration—it’s about preserving a piece of music history. Whether you’re a collector or a casual music lover, framing a record allows you to showcase album artwork, autographs, or special edition pressings in a unique and eye-catching way.
Let’s walk through the process of transforming your vinyl record into a framed masterpiece.
How to Frame a Vinyl Record Album: Step-by-Step
Step 1: Choose the Right Record for Display
Before framing, decide whether you want to frame just the album cover, the vinyl itself, or both. Some collectors prefer displaying the record alongside its sleeve, while others opt for just the cover artwork.
Step 2: Select a High-Quality Frame
Choosing the right frame is essential for both aesthetics and protection.
- Use a shadow box frame or a custom record frame that accommodates the depth of the vinyl.
- Opt for UV-protective glass or acrylic to prevent fading and discoloration over time.
- Consider a floating frame design to create a modern and stylish look.
Step 3: Secure the Record and Cover
To properly mount the record and cover inside the frame:
- Use archival-grade mounting corners or vinyl-safe adhesive strips to hold the album cover in place.
- If displaying the record itself, secure it using plastic clips or clear acrylic mounts to avoid damage.
Pro Tip: Avoid using glue or tape, as they can cause permanent damage to the vinyl or cover.
Step 4: Assemble the Frame
Once the record and cover are positioned correctly, place the backing board over them and carefully secure the frame.
- Ensure everything is centered and aligned before sealing the frame shut.
- If using a shadow box, add a foam backing for extra support.
Step 5: Choose the Perfect Spot for Display
Where you hang your framed vinyl can make a huge difference in its longevity and visual appeal.
- Avoid direct sunlight and humid areas, as they can cause fading and warping.
- Use secure wall mounts or picture-hanging hardware to keep the frame stable.
Pro Tip: Group multiple framed records together for an impressive gallery wall.
Additional Vinyl Framing Tips
Consider Using a Double Mat
A double mat adds depth and dimension to your framed record, enhancing its presentation while protecting the album cover from direct contact with the glass.
Use UV-Resistant Glass or Acrylic
To keep your framed vinyl looking pristine for years, opt for UV-resistant glass or acrylic to block harmful light exposure and reduce the risk of fading.
Shop Vinyl Framing Essentials
Final Thoughts
Framing your vinyl record is a fantastic way to celebrate your love for music while preserving your favorite albums. With the right materials and techniques, you can create a stunning display that adds character to your space.
At Frame Destination, we offer high-quality vinyl frames designed to protect and highlight your collection. Start framing your favorite records today and turn your music into art!
FAQs
What is the best type of frame for a vinyl record?
A shadow box or custom record frame is ideal for displaying a vinyl record, as it provides enough depth and protection.
Can I frame just the album cover without the record?
Yes! Many collectors choose to frame just the album cover, especially for autographed editions or rare artwork.
Should I use adhesive to secure the record?
No, using glue or tape can damage the record. Instead, use archival-safe mounting corners, plastic clips, or acrylic mounts.
How do I prevent my framed record from fading?
Choose a frame with UV-resistant glass or acrylic and avoid placing it in direct sunlight.
What are some creative ways to display multiple records?
Creating a gallery wall with multiple framed records can be a visually striking way to showcase your collection.
Written by Mark Rogers
Mark Rogers is the President and Co-Founder of Frame Destination. With over 20 years of experience in the field, Mark has become a leading authority on framing techniques and best practices, and has earned a reputation for his innovative approaches to custom framing and frame services for photographers and artists.
Vinyl records are more than just music—they’re a piece of history, nostalgia, and art. Whether you’re framing a classic album, a signed record, or a personal favorite, displaying it on your wall can turn it into a stunning focal point. In this guide, we’ll take you step by step through the process of framing a […]
When it comes to framing your cherished artwork, photos, or memorabilia, selecting the right glazing material is critical for ensuring both protection and aesthetic appeal. The choice between acrylic for picture frames and plexiglass often sparks debate among framing enthusiasts. While these terms are frequently used interchangeably, they do have nuances that can influence your decision.
If you're looking for a short answer: acrylic tends to be the better option for most framing needs due to its superior optical clarity, lightweight properties, and versatile protective features. However, plexiglass may be a suitable alternative in specific scenarios. Let’s break down the differences, benefits, and best use cases for both materials.
Understanding Acrylic and Plexiglass

What Is Acrylic?
Acrylic is a transparent plastic material known for its optical clarity and durability. It’s often used as a substitute for glass in framing because it is lighter, less fragile, and can include various coatings like UV protection or anti-glare finishes. Acrylic is a broad category, encompassing multiple brands and grades, such as Lucite and Acrylite.
What Is Plexiglass?
Plexiglass is a brand name that refers to a specific type of acrylic sheet. It shares most properties with generic acrylic but is often marketed as a high-quality option. Essentially, plexiglass is a type of acrylic, but not all acrylic is plexiglass.
Key Differences Between Acrylic and Plexiglass
While acrylic and plexiglass share many similarities, their distinctions come down to subtle factors such as manufacturing process, durability, and cost.
1. Material Composition and Manufacturing
Acrylic can be manufactured using two processes: extruded acrylic and cast acrylic.
- Extruded Acrylic: Less expensive and ideal for projects that don’t require the highest level of clarity or durability.
- Cast Acrylic: Offers better optical clarity, scratch resistance, and uniformity, often found in premium applications like art framing.
Plexiglass is generally made using the cast acrylic process, meaning it typically has higher quality and uniformity compared to lower-grade acrylic products.
2. Durability and Resistance
Both acrylic and plexiglass are far more impact-resistant than glass, but their resistance to scratches and warping can vary:
- Plexiglass tends to be more scratch-resistant due to its high manufacturing standards.
- Generic acrylic may scratch more easily but often comes with coatings to counteract this.
3. Cost
Plexiglass, being a branded and higher-quality material, can cost more than generic acrylic. If you are working on a budget, extruded acrylic may provide a cost-effective solution without sacrificing too much in terms of quality.
Benefits of Acrylic for Framing
Acrylic is a favorite choice among professional framers and art enthusiasts for several reasons:
1. Lightweight and Shatterproof
Acrylic weighs about half as much as glass, making it ideal for large frames or installations that require mobility. It is also shatter-resistant, ensuring your artwork stays safe even in high-traffic areas or during transit.
Shop Picture Frame Glass and Acrylic
2. Customizable Protective Features
Acrylic sheets are available with additional coatings, including:
- UV Protection: Blocks harmful ultraviolet rays, preventing fading or discoloration of your artwork.
- Anti-Glare Coating: Reduces reflections, ensuring your framed piece is visible from any angle.
- Scratch-Resistant Coating: Increases durability and reduces wear over time.
3. Optical Clarity
Acrylic offers exceptional clarity, often appearing as transparent as glass, without the risk of greenish tints that some low-quality glass products can exhibit.
Benefits of Plexiglass for Framing
While plexiglass shares many of the same advantages as acrylic, its standout features make it particularly well-suited for high-value or professional framing applications.
1. Superior Durability
Plexiglass is more resistant to warping and discoloration compared to some lower-grade acrylics. If you are framing items for long-term display, especially in varying environmental conditions, plexiglass offers an edge.
2. Enhanced Scratch Resistance
The high manufacturing standards of plexiglass ensure it is less prone to scratching compared to extruded acrylic, making it an excellent choice for high-traffic areas or professional galleries.
Drawbacks to Consider
Acrylic
- Susceptible to Scratches Without Coatings: Uncoated acrylic can scratch easily, so it may not be suitable for areas with heavy handling.
- Static Attraction: Acrylic tends to attract dust due to static electricity, which can be problematic for delicate materials like pastels or charcoals.
Plexiglass
- Higher Cost: As a branded product, plexiglass is often more expensive than generic acrylic, which can make it less appealing for budget-conscious projects.
- Weight: While still lighter than glass, plexiglass can be slightly heavier than some extruded acrylic options.
Which Should You Choose for Framing?
Choose Acrylic If:
- You want an affordable, versatile, and lightweight solution.
- You need UV protection or anti-glare features for preserving and displaying art in various lighting conditions.
- Your frame will be moved frequently, making shatter-resistance a priority.
Choose Plexiglass If:
- You are framing high-value or professional artwork where durability and optical perfection are paramount.
- The framing environment may expose the glazing to more wear and tear, requiring enhanced scratch resistance.
- Budget is less of a concern, and you’re seeking a premium-grade material.
Tips for Using Acrylic or Plexiglass in Framing
1. Handle With Care
Always wear gloves when handling either material to avoid leaving fingerprints or scratches.
2. Clean Properly
Use a microfiber cloth and a cleaner specifically designed for acrylic to prevent damage or clouding.
3. Opt for UV Protection
If your artwork will be exposed to natural light, prioritize materials with UV-blocking capabilities to avoid fading over time.
4. Match the Material to the Project
For large frames or intricate designs, the lightweight properties of acrylic or plexiglass make them much easier to manage than glass.
Final Thoughts
When choosing between acrylic and plexiglass for framing, the best choice depends on your specific needs, budget, and the value of the item being framed. For most projects, acrylic provides a winning combination of affordability, versatility, and protection. However, if you’re framing valuable or professional artwork, plexiglass may be worth the extra investment for its durability and clarity.
By understanding the differences and evaluating your priorities, you can confidently choose the best glazing material to showcase and protect your treasured pieces for years to come.
Further Reading:
Written by Mark Rogers
Mark Rogers is the President and Co-Founder of Frame Destination. With over 20 years of experience in the field, Mark has become a leading authority on framing techniques and best practices, and has earned a reputation for his innovative approaches to custom framing and frame services for photographers and artists.
When it comes to framing your cherished artwork, photos, or memorabilia, selecting the right glazing material is critical for ensuring both protection and aesthetic appeal. The choice between acrylic for picture frames and plexiglass often sparks debate among framing enthusiasts. While these terms are frequently used interchangeably, they do have nuances that can influence your […]